A Step-by-Step Information to Making a Easy French Braid
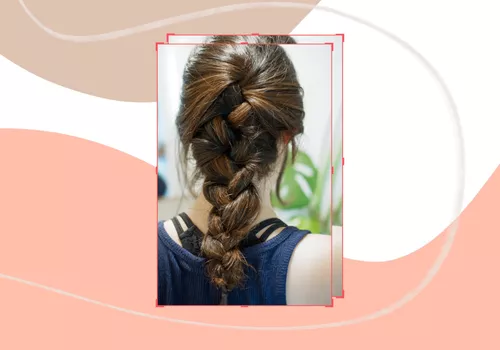
Whereas everyone knows in regards to the versatility of a French braid—you may spot them in all places from elementary faculty lecture rooms to the crimson carpet—one factor the type will not be precisely well-known for is its ease of execution. However surprisingly, this coiffure is way easier to attain than it seems.
Do not let a brand new braiding method intimidate you, Byrdies. Under is an easy-to-follow, step-by-step breakdown of a traditional French braid.
Collect Provides

All of those provides are non-compulsory aside from the elastic. No matter in case you plan to make use of them or not, I like to recommend having them close by so that they’re straightforward to entry do you have to select to depend on them as you go.
- An elastic band
- Japanese hair pins: these have ridges alongside the pin that assist them keep within the hair with out slipping.
- Matte bobby pins: they arrive in pure hair colours and change into invisible within the hair.
- A comb or detangling brush; select a favourite based mostly in your hair sort.
- Dry texture spray or hairspray
Comb the Hair

Comb via dry hair to do away with any knots or tangles. (Moist hair will shift because it dries so braiding moist hair might yield a less-perfect braid). When you’ve got finer hair that is susceptible to tangling, you need to use a detangling brush just like the Moist Brush ($7) or a Tangle Teezer ($11). I’ve thicker hair that I am not used to brushing, so I opted for a large tooth comb. Beginning right here will allow you to seize sections of your hair simply as you braid.
Create Three Sections

You are going to create three sections: one from the left, one from the middle, and one from the appropriate. You can begin wherever you would like. For a tighter, safer French braid, I might counsel beginning proper on prime, within the middle of your head (simply above your brow). A tighter look will not have any parting seen.
For a looser French braid (which is what I’ve determined to do right here) you can begin proper above the ears and hold your pure parting as is. It is simple to seize the aspect sections above the ear as in case you had been doing a half-up type. When grabbing hair from the middle, attempt to really feel it out and hold it roughly the identical dimension as your aspect sections.
Left Part Over the Middle Part

Start by taking the left part of your hair and bringing it over the middle part. Your left part ought to now be on prime and has taken the spot of your middle part.
As you overlap the left above the middle, pull that authentic middle part over to the left, nearly as in the event that they’re switching locations. When you do that, regulate your palms to a extra snug grip; you’ll probably do that naturally, shifting your grip on the three sections as you progress the hair.
Proper Part Over the Middle Part

Now, convey your proper part over the middle piece. Once more, pull these sections into their new placement. There isn’t any want to maneuver the hair round delicately—hold issues taut as you go. Each time you pull a aspect piece over, it turns into your new middle part. That being mentioned, your proper aspect ought to take middle stage amongst your three sections of hair.
Add Hair to the Left Part

Now as you seize that left part of hair, you are going to add extra hair to it from the left aspect. Primarily, you are thickening the part earlier than bringing it over the middle as you probably did earlier than. As soon as the extra hair has been added, repeat what you initially did and carry the whole part over the middle strands.
Add Hair to the Proper Part

Repeat the identical factor right here on the appropriate aspect. Add some hair from the appropriate to your part, thickening it up earlier than carrying it over to the middle.
Proceed All the way down to the Nape

Proceed so as to add hair to the left and proper aspect sections earlier than carrying them over. Do that till you have labored your approach all the way down to the nape of your neck and have run out of hair so as to add to every aspect.
End Off With a Traditional Braid

As you close to the underside of your strands with no additional additions to be made to your sections, keep on with a traditional three-strand braid. Observe the identical rules you have been utilizing this whole time: left over middle, proper over middle, repeating backwards and forwards all the way down to your ends.
Safe Your Ends

Safe your ends collectively leaving someplace between 1/2″ and 1″ of your ends out. The tighter your braid, the much less of your ends you will need to pass over and unbraided; for looser braids, depart extra ends “undone” and untouched. Hair ties are likely to unravel simply, so for that purpose I like to recommend utilizing a small elastic tie. As soon as you have ensured your ends are safe, be happy to return in and adorn your braid with a scrunchie, barrette, or any of your different favourite equipment.
Ending Touches

Because you untangled the hair at first, you is likely to be left with slippery strands that are extra susceptible to falling misplaced, particularly in case you have layers. At this level, I like to recommend entering into with a dry texturizing spray for further maintain. We love Oribe Dry Texturizing Spray ($49).
To loosen issues up a bit extra, gently pull aside the braid to thicken it up and produce out any face-framing items for a extra romantic, “undone” vibe. Additionally, in case you introduced your braid round one shoulder to tie off your ends, swing your braid round to the opposite aspect to provide it some equilibrium (making certain one aspect is not tighter or looser than the opposite). If any of your layers are protruding of your braid, use a Japanese hair pin or matte bobby pin to secretly tuck these ends again into your braid.
As soon as you have made all these closing tweaks to your French braid, you could have the choice to mist a smooth maintain hairspray throughout to maintain issues locked in for the lengthy haul.
Should you’re fascinated by attaining French braid pigtails, create two sections of hair on both aspect of the top, and repeat all the above steps on both aspect.