I Bleached My Brunette Hair at Dwelling With out Damaging It—This is How
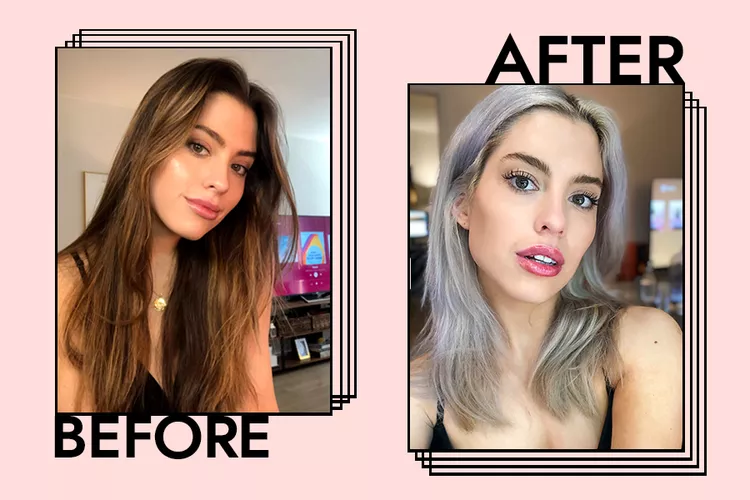
Properly, I did it. I bleached my hair at house with none injury. Remodeling my hair from chestnut brown to Khaleesi silver took loads of analysis, dedication, and, frankly, risk-taking than is conveyable in my group chats.
In mild of this reality, I’ve delineated the precise precautions, merchandise, and step-by-step course of I used to bleach and tone my hair silver at house. Enormous disclaimer: I’m not at all knowledgeable colorist. Furthermore, the skilled colorists I did converse to have been decidedly against my DIY-silver-shenanigans (the overarching sentiment: “go to a professional!”) however they have been sort sufficient to spill a few of their secrets and techniques nonetheless.
If—towards your higher judgment and the recommendation of each colorist ever—you’re dead-set on going silver at house seize a notepad and proceed—with utmost warning. However earlier than we begin, a couple of stuff you should learn up on earlier than you bleach and tone.
Acknowledge the dangers
Whereas there are bleach-free formulation that assist you to quickly swap your colour on a whim, going from brown to silver in a everlasting method “completely” requires bleach, notes WELLA Chief Blonding Officer, Zach Mesquit. Sometimes called “lightener,” bleach is a strong chemical that may have a darkish facet. “The bleaching course of can fully damage your hair past restore when used incorrectly or too rapidly,” Mesquit warns. It is because the mechanism by which bleach works to lighten your hair is inherently damaging.
“Bleach actually breaks aside the proteins in your hair,” explains Aura Friedman, superstar colorist and artistic director at Sally Hershberger Salon in NYC. “[This] makes your hair extraordinarily weak,” she provides, and “finally results in breakage, in addition to frizz and dryness.”
For me, it took watching a couple of dozen “bleach fail” movies and studying a handful of horror tales to completely respect the dangers of taking part in colorist at house. At worst, bleach can soften your hair off; at finest, it inflicts delicate injury—which, although imperceptible to the bare eye, nonetheless inevitably exists (you’d see it underneath a microscope). Backside line: bleach damages your hair to some extent. In the end, the purpose is to inflict the least diploma of harm doable. Educated professionals are, nicely, execs, at mitigating bleach injury—however as somebody who’d by no means touched the stuff, I had rather a lot to review earlier than I stocked up on provides.
Do your analysis
Originally of stay-at-home orders, hair colour analysis turned a passion; one which changed the gaps in my calendar I’d as soon as full of social actions. I’d stare unblinkingly at my display till my eyes damage; if I awoke and couldn’t fall again asleep, I’d return to my laptop computer and analysis some extra. Pinterest, Reddit, Youtube, and Byrdie turned my go-to sources for hair colour how-tos. Even now, I nonetheless spend vital time making an attempt to study extra about beaching, firming, and hair colour normally. In fact, no quantity of bleary-eyed analysis can match the data and talent of knowledgeable—and in my case, my lack of artistry exhibits in the event you look actually carefully at my roots. In spite of everything, colorists spend vital time studying to excellent the various nuances of their craft.
Perceive your timeline
One other time-related consideration: relying on how darkish your hair is, to start with, it may take weeks (at the very least) to months (extra seemingly) to soundly attain the pale silver colour you’re going for. The reason is, that your hair wants time to recuperate between bleach periods.
I bleached my hair a complete of thrice over the course of a month and a half. Every time, it turned a brand new shade of brassy—orange to orange-yellow, orange-yellow to pale yellow—and I’d be mendacity if I stated I didn’t really feel slightly self-conscious throughout these transitional phases. Nowhere is the adage, “endurance is a advantage” extra obvious than with hair bleaching at house.
Perceive your hair’s “ranges”
Earlier than I began taking place varied hair-color-wormholes, I didn’t absolutely perceive why I couldn’t merely slap silver dye over my brown hair and name it a day. The rationale, I’ve discovered, is rooted in hairs’ pure colour pigments, and finest defined by one thing referred to as the extent system.
Merely put, the extent system is a scale colorists use to reference how mild or darkish somebody’s hair is. The usual degree system goes from 1-10 (although I’ve seen 1-12), with 1 being black, and 10 being a particularly pale yellow. (Notice: “degree” is completely different from tone; extra on why later.) Figuring out the place your pure hair colour falls on the extent system (I’m round a degree 4) can present a reference level for the way mild your hair would possibly “carry” in a single bleaching session. You’ll be able to then use this data to gauge what number of bleaching periods you’ll want.

Your degree is decided by the quantity of pure pigment, aka melanin, every strand accommodates. I’ll spare you the chem class flashbacks, however principally, bleach, when paired with peroxide, opens the hair cuticle (aka your hair’s outer layer) and “lifts” these pigments out. The darker your hair, the extra quite a few your pigments; the extra quite a few your pigments, the extra you’ll need to “carry” these pigments to lighten your hair. “You can not obtain silver-colored hair until the hair is lifted to at the very least a really mild degree 9— ideally you desire a degree 10/platinum,” notes Mesquit. (For reference, many individuals examine ranges 9/10 to the colour of the within of a banana peel). Solely when you’ve reached this “lifted,” de-pigmented state are you able to go in and add pale silver pigment—normally by way of toner.
One widespread analogy that illustrates why you might want to “carry” earlier than you deposit a light-weight colour into the hair: Think about utilizing a yellow highlighter on a darkish (black/brown) piece of paper. Doesn’t present up so nicely, huh? Now, think about utilizing that yellow highlighter on a bit of pale printer paper—voilà! Much like that yellow highlighter, toners within the silvery-platinum-blonde households can’t merely change darkish pigment with out bleaching it first. That underlying pigment must be eliminated to ensure that the silver to indicate up.
It’s additionally value noting that peroxide, aka “developer,” is a mandatory element of the bleaching course of. With out it, the bleach can’t carry colour pigments. Nevertheless, it is very important word that peroxide developer is available in completely different strengths.
Peroxide energy is measured in what colorists name “volumes.” Peroxide volumes sometimes vary from 10-40, with 10 being the least highly effective by way of “carry” and injury potential, and 40 delivering essentially the most “carry” and crazy-risky injury potential. Each Mesquit and Walker advise steering away from something increased than 20 quantity. Admittedly, I used 30 quantity developer the primary two occasions I bleached; it labored, however I can’t assist however marvel how a lot more healthy my hair would look now if I’d used 20 all alongside.
Perceive tone
Whereas “degree” strictly refers to how mild or darkish your hair is, “tone” refers to nuances—e.g. heat, coolness, ashiness—inside every degree. Tone is a fancy idea to know until you’re knowledgeable who has studied colour idea, however right here’s how I consider it: a cool-toned blonde (à la Gwen Stefani) and heat blonde (like Gigi Hadid) may be inside the similar “degree,” however tone provides off drastically completely different results.
I knew I needed an ashy, cool-toned pale blonde, however, frankly, I hadn’t anticipated my hair to show straight-up silver-gray. Fortunately, I like my colour now—however the preliminary reveal had me panicking and regretting the DIY factor. Even Mesquit, one of the vital famend colorists within the silver-sphere, says toner comes with some extent of unpredictability. “Everybody’s hair will seize slightly completely different,” he explains, “[so] there’s no magic components relating to toner.” To not point out, “silver is among the trickiest colours to get proper; even the slightest change to the [toner] components will have an effect on the completed consequence.” For reference: that is the colour I needed; under is the colour I acquired.

To additional complicate issues, “Individuals all describe silver in a different way,” Mesquit notes. “Sometimes, a lighter silver shall be violet-based, and darker shall be extra blue-based.” He additionally says you’ll be able to combine toners, however once more, that is the form of factor finest left to a professional until you’re prepared to experiment. The excellent news (or dangerous information, relying on whether or not you want your toner outcomes): Toners are inclined to fade over time. For me, my ultra-gray hair turned a silvery platinum after about 5 washes. Between washes, I completely swear by this masks for holding my colour ultra-gray and banishing yellow tones.
Nonetheless with me? Wonderful. With out additional ado, a step-by-step information to how I bleached my hair from degree 4-ish brown to degree 8/9-ish silver.
Provides You may Want
Not like the neatly-packaged, all-in-one field dye kits bought at drugstores, bleaching and firming accoutrements typically come piecemeal—and, since bleaching has little or no room for error, it’s additional essential to make sure you have every little thing you want earlier than you begin. The primary time I bleached my hair, it took per week or so to collect all of my provides (transport proved spotty from sure distributors; plus, I ignored some objects I later realized I wanted). Right here’s a complete listing of the merchandise I take advantage of to bleach, tone, and strengthen my hair, plus a couple of picks from the professionals for good measure.

Provides for bleaching:
- Bleach: I take advantage of Schwarzkopf Blondme Bond Implementing Premium Lightener 9+ ($28), which is infused with bond-strengtheners to mitigate injury. Professional picks: Wella Professionals Blondor, Redken Flash Elevate.
- Peroxide developer: I take advantage of Schwarzkopf Blondme Premium Care Developer ($18).
- Plastic mixing bowl: I prefer to have two readily available; one for bleach, one for toner.
- Massive applicator brush: Ideally with a sharp tip for sectioning.
- Rubber gloves
- Sectioning clips
Should you’re shopping for skilled merchandise on-line, be sure to’re utilizing a good supply. I purchase most of my provides from Amazon, however provided that the product has overwhelmingly constructive opinions.
Provides for firming your hair silver
- Silver toner: I take advantage of Redken EQ Gloss in 09T and 09P (equal components) or Wella T-18. Professional picks: Wella Colour Contact (1.9%/6vol), Wella T-18 (10 or 20vol)
- Peroxide developer: I take advantage of Schwarzkopf 20 vol. Professional picks: Wella 10 or 20 vol Redken’s Shades EQ processing resolution, 6vol
Elective, however extremely beneficial:
- Plastic bathe caps (one for bleaching, one for firming): These disposable caps from Amazon include 100 per pack—you’ll by no means run out!
- Two massive mirrors: Positioned in a method that lets you clearly see the again of your head (a buddy, associate, or prepared member of the family may even do).
- A mild microfiber towel: I take advantage of Aquis Unique Hair Towel ($21).
Provides for strengthening and aftercare
- Protein and/or moisture remedies: I take advantage of K18, Sachajuan Hair Restore, and Kérastase Blond Absolu Strengthening Conditioner. Execs use: K18, Olaplex Nº. 3, Redken PH Bonder.
Now that you’ve got your provides, it is time to bleach.
How you can Bleach Your Hair At Dwelling
Step 1: Part the hair for bleaching
As with most magnificence remedies, prep work is crucial for a refined consequence. Bleach works finest on dry hair; ideally dry hair that hasn’t been washed shortly. At the start, says Walker, “Be certain that to have brushed out your hair—no knots, please!”
Subsequent, it’s time for sectioning. (The primary time I bleached my hair, I’d underestimated the significance of partitioning and ended up with some patchy bits in consequence; my solely saving grace was my boyfriend, who slapped on some bleach within the areas I’d fully ignored). Sectioning your hair makes the method rather a lot much less overwhelming, extra manageable, and will increase your probabilities of even utility, Walker explains.
Part your hair into quarters, and use your clips to safe every quarter. Walker breaks it down as follows: “Begin [by creating] a middle half straight again to the nape of the neck.” This can go away you with two massive sections of hair on both facet of your head.
To make 4 sections, use the sharp finish of your applicator to separate every of the 2 massive sections in half. Then, run the sharp finish “from the highest of your head to the again of your ears” on both facet to create a line that splits every part down the center. After getting 4 sections, clip every part in place. “This can make it a lot simpler to remain clear and never get overwhelmed making an attempt to [bleach everything] ,” notes Walker.
Step 2: Combine your bleach and developer
Put in your gloves, guarantee surrounding surfaces are coated, and usher any pets, youngsters, and so on. out of the room to keep away from publicity to bleach fumes.
Walker stresses the significance of at all times measuring your bleach and developer. Most bleaches will include slightly measuring scoop, just like a espresso scoop—use it! Walker, who makes use of Redken Flash carry or Wella Blondor, says a ratio of 1 half bleach, 1.5-2 components peroxide “will provide you with an important consistency to work with.” I can attest to this; sometimes, I combine 1 scoop of bleach with 2 scoops of peroxide for a clean, pudding-like mix that doesn’t drip or run.

Step 3: Apply your bleach
Nonetheless have these quarters of hair clipped up? Wonderful. You’ll be working with these in a second; however first, a couple of guidelines of thumb to remember all through the bleach utility course of:
- Put on gloves all through your complete course of to guard your fingers from irritation (chemical burns are not any joke!).
- Ensure you’re utilizing sufficient bleach and lay it on thick. “This ensures your hair is absolutely saturated,” Walker explains; “in any other case you could possibly find yourself with a really patchy consequence.”
- Ensure you’re overlaying each side of the hair. In different phrases, each time you “paint” a bit with bleach, don’t overlook to flip the part over and “paint” the again, too.
Placement: beginning 1cm from the basis, working your method from the again to the entrance “quarters.”
In keeping with Walker, the backmost and bottommost sections of hair are typically darkest, and thus, can deal with slightly bit of additional processing time. Because of this, he advises making use of bleach on the again “quarters” earlier than making your method to the entrance. (Professional tip: the child hairs within the entrance develop far more rapidly and are most vulnerable to break, so save these for absolute final).
With a set of mirrors positioned in a method that lets you see the again of your head, seize one among your two “quarters” within the again. Unclip your chosen quarter and let the hair fall free. Then, utilizing the tapered finish of your applicator, create a horizontal half inside your chosen quarter. Doing so splits the part into two manageable items: one which’s closest to your neck, and one which lays on prime. (Should you’re fortunate sufficient to have extra-thick hair, chances are you’ll want a couple of extra horizontal layers). Because the hair closest to the neck is normally darkest, begin your utility right here and work your method up.
Walker advises beginning your bleach utility about 1cm away from the scalp and leaving your roots uncovered till the very finish. (Your roots develop extra rapidly than every other space attributable to warmth from the scalp).
After you’ve coated the bottommost layer of your chosen again quarter, coat the remaining, overlying phase(s) till you’ve coated all the hair inside your quarter. When you’ve accomplished this quarter, transfer to your remaining again quarter. Repeat the aforementioned “layering and portray” course of.
When you’ve coated each of your again quarters, give your self a fast pat on the again—you’ve accomplished, arguably, the toughest a part of this complete course of. In fact, there are nonetheless two extra untouched segments within the entrance—nonetheless, I discover the entrance considerably simpler to work with. For every of those remaining entrance sections, comply with the identical technique you used for the again, persevering with to depart about 1cm of root untouched.
Step 4: Bleach your roots
Time to get your roots in on the motion. Walker advises mixing a recent batch of bleach particularly for this space—“your roots are value it!” he notes. “After getting utilized the bleach 1cm off the scalp proper via to the ends, return to the primary part and begin making use of on the roots.”
Step 5: Use a plastic bathe cap (non-obligatory)
After I’ve slathered my strands in bleach, I pop on a plastic bathe cap. This retains my hair considerably in place; extra importantly, although, the plastic traps warmth and moisture, each of which maintain the bleach energetic. “Bleach will proceed to carry so long as you don’t let it dry out,” says Mesquit. As soon as it’s gone flaky and dry, although, it’s form of simply sitting on the hair.

Step 6: Watch the clock and test your progress
When you’ve coated all your strands, together with roots, with bleach, it’s a ready sport. As per the directions on my bleach, I set a timer for 45 minutes. Throughout that point, I test my strands each 10 minutes or so by wiping off a little bit of bleach and eyeballing the hair beneath. This course of is essential for 2 causes. First, it lets you see whether or not the colour is lifting evenly and successfully. Second, checking lets you affirm that your hair remains to be intact and usually OK.
A fast caveat: whereas it’s essential to make sure you don’t go away your bleach on for too lengthy, it’s additionally essential to present the lightener sufficient time to, nicely, lighten successfully. In different phrases, don’t leap the gun and take away the bleach too quickly. I made this error the primary time I bleached my hair. In consequence, my colour barely lifted; it was pure pumpkin orange—which, in response to Mesquit, is indicative of untimely bleach removing. To compensate, I ended up re-bleaching it that very evening. Not solely was this difficult on my hair, but it surely was additionally a waste of treasured bleach! “It’s higher to let [bleach] sit in your hair for a very long time than to scrub it and re-apply [the same day],” Mesquit notes.
In fact, this recommendation is contingent upon how your hair is holding up. In addition to performing the aforementioned checking, Mesquit recommends performing a fast “stretch check” to find out whether or not your hair can deal with a bit extra time underneath bleach. Right here’s how: “Seize a strand of hair and gently tug on it; if it feels prefer it’s getting stretchy in any respect, then wash [the bleach] out instantly.” This is a sign that the bleach has leached method an excessive amount of moisture out of your hair—and issues may get dicey very quickly. Nevertheless, so long as the hair feels comparatively robust (not gummy or stretchy), you’ll be able to go away the bleach in for a bit longer (inside cause—by no means go away it longer than the directions advise).
Step 7: Rinse—and rinse once more
As soon as your timer has gone off, take away your cap, clips, and so on., and hop within the bathe. Activate some lukewarm water (no temperature extremes, which may shock your freshly-bleached hair!). Then, seize a mild shampoo (Walker and I each love Redken Bleach Restoration, $27) and start to scrub your hair as gingerly as you’d a child’s. Along with being mild, make sure that your washing is thorough, notes Aura. “If any bleach stays in your hair, the chemical substances might trigger scalp burns or different injury,” she warns. To be protected, I shampoo twice. I’ve additionally discovered a scalp brush like Conair Detangle and Go Bathe Therapeutic massage Brush ($6), to make sure I’ve gotten any grittiness from the bleach out of my hair.
Step 8: Nourish your hair
When you’ve shampooed adequately, apply a deep conditioner or moisturizing remedy masks. I swear by Kérastase Cicaflash Blond Absolu ($42), which is a little bit of a hybrid between the 2. Let the remedy sit for 10 minutes or so. Rinse. Hop out of the bathe and towel-dry your hair, ideally with a supersoft microfiber towel. I like Aquis for gently urgent extra moisture from my strands and holding friction—which may result in breakage—to a minimal.

Step 9: Put together for firming
If after you’ve towel-dried, you discover your hair is an alarming citrus shade, fret not! That is the place toner is available in—and it makes a huge distinction.
It bears repeating: to attain a pale silver, platinum, or someplace inside that realm, you could first make sure you’ve “lifted,” your hair to a degree 9 or 10—which, until you’re a pure blonde, will take multiple spherical of bleaching. Should you’re not there but, merely select a toner made in your present degree. (PSA: critically beautiful silver hues exist in any respect ranges).
For mild silver: When you’ve lifted your hair to a pale yellow (for me, it was three rounds of the aforementioned bleaching course of, spaced at the very least per week aside), you’re prepared to make use of a light-weight silver/grey toner. I alternate between Wella T18 and/or Wella T11, or equal components Redken Shades EQ O9P and 09T.
Lay out your firming provides. This consists of toner(s), peroxide developer (both 10 or 20 vol. relying on toner directions), a recent pair of gloves, a brand new (or washed) plastic mixing bowl, a brand new (or washed) applicator, and a bathe cap in the event you so please.

Step 10: Combine your toner and peroxide
Much like the way you wanted so as to add peroxide developer to your bleach mix earlier, you’ll want to combine peroxide developer along with your toner, too, to be able to “activate” its powers. The ratio of peroxide developer to toner components is variable relying on the merchandise you’re utilizing. For the particular toners I take advantage of, it’s normally one half toner to 2 components developer.
As an alternative of utilizing the inside track to measure toner, I’ve discovered it’s simpler to dump your complete bottle of toner into the plastic mixing bowl first, after which use the empty toner bottle as a measuring instrument for peroxide. So, for a 1:2 ratio, I dump one bottle of toner into the bowl; then, I fill the empty bottle twice with peroxide.
When you’ve measured and poured your toner and developer, it’s time to combine your magic potion. Put in your gloves and start mixing your concoction along with your applicator brush. Combine till absolutely included. The components must be considerably much less thick than your bleach components was.
Step 11: Apply your toner
Fortunately, making use of toner is extra of a low-stakes operation than making use of bleach; not solely is it much less dangerous in your hair well being, however toner can be extra forgiving by way of utility technique. You must actually part and apply similarly as you probably did along with your bleach—nonetheless, there’s a bit extra leeway.
When you’ve absolutely saturated your hair, loosely clip it up and/or cowl it with a plastic bathe cap. (Should you do determine to make use of the bathe cap technique, remember that your toner might develop extra rapidly than the directions counsel).
Step 12: Set a timer and wait
I at all times set my toner timer for 20 minutes. This appears to be commonplace for many toners; in the event you’re utilizing a special toner from those I discussed, although, remember to double test your product’s particular directions.
Notice: Any silver/grey toner I’ve used turns my hair an attention-grabbing shade of steely plum through the growth course of. Any undesirable purple hue ought to wash out within the bathe, however leaving it in for longer than suggested runs the chance of leaving your hair a shade of lavender for a couple of days till it fades.
Step 13: Wash your hair—for the ultimate time
As soon as your timer is up, hop within the bathe. Lather up with the identical mild shampoo you used to scrub the bleach resolution out of your hair. Observe with a deep conditioning masks and/or restructuring remedy of alternative. (By the way, I’d counsel investing in each product varieties; I are inclined to alternate relying on whether or not my hair appears to be missing protein or moisture on any given day).
Aura says bond-building and restructuring merchandise are “unbelievable for repairing hair” post-bleach. Her present favourite, K18 Peptide Masque ($75), additionally occurs to be my go-to today; I swear it’s the rationale I’ve had little or no breakage all through my silver-hair journey. In fact, Olaplex is an alternative choice; an possibility Walker and a zillion different execs swear by for therapeutic protein bonds damaged within the bleaching course of.

Publish-care
Schedule common trimmings
Should you’re feeling significantly formidable along with your newfound DIY expertise, take into account giving your self a little little bit of a trim to nix any fried ends that will have been exacerbated by the bleaching course of. I’ve discovered that doing so makes my hair look considerably more healthy. Should you do select to do that your self, be sure to’re utilizing legit hair shears, which can reduce far more cleanly than those in your workplace drawer. Should you’d fairly go away the scissor-work to a professional (advisable!), schedule an appointment each month or so.
Replenish on purple shampoo
Your blonde mates all use it to counteract inevitable brassiness; and, because it seems, silver-haired people ought to use it, too. “Purple shampoo is essential as a result of silver fades extraordinarily quick,” Mesquit notes. “Utilizing purple shampoo will assist refresh a few of these cool tones which might be misplaced and maintain the hair wanting icy.” His alternative: Wella Professionals Invigo Blonde Recharge Colour Refreshing Shampoo Cool Blonde ($17). Store extra purple shampoo choices right here.
Deep situation day by day
The week after bleaching your hair, you might want to decide to deep conditioning your hair daily. Sure, day by day. This can assist maintain your hair hydrated, and feeling and looking wholesome. We’re massive followers of Briogeo Do not Despair, Restore! Deep Conditioning Masks ($38), that is designed to infuse your hair with moisture and strengthen your strands.
Use weekly bond repairing remedies
Bond repairing remedies assist restore the integrity of your hair and maintain your hair from shedding and breaking excessively. After you have bleached your hair, you wish to make sure that to make use of a bond repairing remedy, just like the ever-popular combo of Olaplex Nº.0 Intensive Bond Constructing Remedy ($28) and Nº.3 Hair Restore Protector ($28).
Hold constant and bleach roots
As soon as you have made the dedication to bleaching your hair and also you’re planning on rocking the colour for some time, you might want to make sure that to bleach your roots each 4 to 6 weeks. Should you let your roots develop out too lengthy, you danger needing to bleach all your hair over again, which may trigger injury.